
Fusion Generator
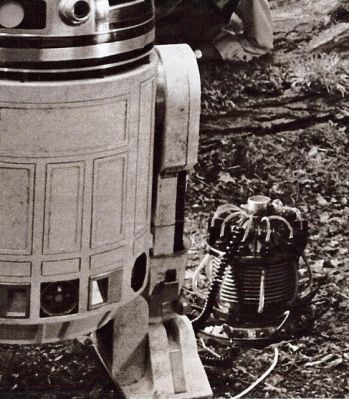
The Fusion Generator is what charged Artoo on Dagobah in the Empire Strikes Back. Presumably it could be used to power lots of your droids!
aka: Fusion Reactor, Fusion Generator, Fusion Furnace.
Contents
References
Photos - Collected from the astromech.net thread and other sources Fusion Generator Reference section.
The Fusion Reactor thread on astromech.net details SavageCreature's process while he created all the digital files.
The generator has plans in the Fusion Generator Construction Plans section!
3D Printed Parts are also needed of the Fusion Generator 3D Files
Plans
There are Fusion Generator Construction plans and Fusion Generator 3D Files in the files section.
(Alternate Laser Cut Files exist for those that need them)
The current plans are "beta" quality and require both 3D printing and Styrene flat packs.
- Several parts are intended to be cut as a "flatpack" and assembled
- Other curvier details are expected to be 3D printed.
- Parts like hoses will need sourced. (see below)
Build Logs
Kresty Style Build Guide in the Wiki has step-by-step instructions, but is only about half done.
Kresty's Fusion Generator Build
Savage's thread where he eventually got around to creating his own build log. (It's a race!)
Fusion Generator Photos detail of Savage's creation of the plans.
Savage's Astromech.net thread detailing his creation of the plans.
Kresty's Questions where Kresty nags Savage for details/questions about the plans!
Lighting
Phillips makes a 120V Orange LED light that looks pretty good in it.
I'd intended to use neopixel/WS2812b style LEDs, but may not bother after trying the simple light!
Note regarding the lights: The original screenshots show the lower hose fittings as being translucent, like the hose, so the fitting and hoses both glow.
The main body needs some sort of diffuser to make it look nice.
Construction
Kresty Style Build Guide is a step-by-step guide, about half done.
Let everyone know if you have construction tips!
The top was originally some sort of fan, and those tend to have odd #s of blades, in this case 11. It seems a little odd when first looking at this project that some bits have multiples of 11 and others happen 8 times. Which also leads to a strange alignment trying to get some bits on 45 degree centers and others on 32.72... degree centers.
The eleven fins can either be 3D printed or cut from 3mm (⅛") styrene.
3 of the flat pack parts have notches that Savage intends to hold the vertical cylinder type parts. If you don't use a CnC to cut the parts, you may want to consider making another ring to hold those parts instead of trying to notch the styrene without a CnC.
Assembly
Refer to the Fusion Generator Exploded Diagram.
Tips: For the base you can dry assemble the bottom A, the supports B, and the rings D, F & H (if you cut the rings in halves you may want to glue them into a complete ring first). They you can fix them in place with a thin glue. After that it is easier to add the C, G & E bands.
H1 can be glued to the top of H even after it is in place.
The E band should have the top and bottom edges filed to an appropriate angle (about 45 degrees) for the best fit. Make sure the angles are in the same direction (cross section should look like a parallelogram).
Pressing and pulling the I grill and L window strip parts over the edge of a table or similar can help form them into a round shape.
You can stagger the seams of the J ring halves when attaching them to the round grill I. The fit may be tight enough to hold the entire assembly in place, and then you can use thin glue to fix the rings to the grill and to connect the ring halves.
There are 10 J rings on the grill. The K ring fits on top of the uppermost J ring, but inside the I round grill instead of outside.
The 3D printed top is intended to be attached to the M ring without glue to provide access to the inside of the fusion reactor. Other methods may be used though if desired.
Wire Coils
Wrap 3-4' (1m or so) of copper colored wire around a 1/2" (1cm) dowel to make the coils. Should probably be around 16 gauge (1.5mm),
Parts List
3D Printed
The 3D Print file names say how many you need of each part, eg: x11
 baseKnob_x16.STL
 baseSlantCableMount_x8.STL
 baseUpperCableMount_x8.STL
 heatsink_x11.STL
 hose_socket_x11.STL
 mainHoseMount_x8.STL
 TopSeg_01.STL
 TopSeg_02.STL
 TopSeg_03.STL
 TopSeg_04.STL
 TopSeg_05.STL
 TopSeg_06.STL
 top_cap.STL
 top_fin_x11.STL (could also cut from 1/8" styrene)
 top_lower_nipple_x11.STL
 upper_hose_mount_x8.STL
Note that the top is 6 segment parts. One is single size, between two fins, and the others are double size. Savage provided unique files for each as they vary a tiny bit, however the difference is < 0.5mm so you can probably use any of them in any order as long as you have 5 doubles and a single.
Alternate 3D Files
There are also alternate files for the top segments and the top cap.
 Top (modified segment) - flat further near the edge and a lip to hook next segment on for easier assembly.  Top needs 11 segments
 Top (modified double segment) - As above, but 2 segments as one part.
 ... w supports - those two files also have version with moderate supports because Kresty's work printers were having trouble. (untested)
 Top Cap (modified) - This file is hollow, like a cup.  Savage's original was solid.  Print top down.
 Top Cap (modified alt) - If the rounded corners don't work, this prints right-side up without supports, but is denser so the top doesn't sag.
Flatpack
The Flatpack files have multiple copies of each part and seem to be designed for ~25x34" sheets. If you cut all 3, then you'll get a full set of parts.
 00_flatPieceLayout_2.pdf  (1/16" (1.5mm) Styrene)
 01_flatPieceLayout_2.pdf  (1/8" (3mm) Styrene)
 02_flatPieceLayout.pdf    (1/8" (3mm) Styrene)
02_flatPieceLayout has markings for a slot for the rest of the parts to slide in on the top piece, that may need removed for some machines, Savage cut the slot with his CnC. Similarly the bottom parts on that page have an extra line where the rounding begins, you may need to remove that line.
Alternate Laser Cut Flatpack
The Laser Cut Files are a modified version of Savage's flatpack above. They are intended for lasers with 18x24" beds and will not work to CnC (parts are touching, so no room for the CnC bit). (Kresty's build uses these.)
The laser cut files includes outlines for the translucent parts as well.
Fusion Generator Laser Cut Flatpack Details has more info on how the laser flatpack is set up.
Additional
There are additional parts not listed in the above plans:
 Hoses
 Wire coils (top x8)
 Upper clear/translucent lens - 1 1/8" tall by 24 7/8" wide
 Inner grill window - 4 1/2" tall by 25" wide (could be a bit shorter, but 24" is almost too short)
 Inner "bucket" (optional) - to conceal charger.
Wire Coils
The wire coils on the top are around 16 to 18 gauge (1.5mm) copper colored wire. You can make a spiral by wrapping them around a 3/8" or 1cm dowel. It takes about 3-4' or 1 meter per coil. So you'll need about 15 meters or 50' of wire.
Hoses
There are 8 clear "upper" hoses and 8 dark "lower" hoses - the lower hoses might be more like cable/wire since one of those spots seems to be where Artoo's plugged in.
For the upper hose I'm using 7 1/2" (190mm) of 7/16"OD & 5/16 ID clear vinyl hose that can be found in most US hardware stores.
For the lower hose/wire I'm using 10" (250mm) of 1/4" (6mm) black porous soaker hose. I liked the texture. The inner diameter is a little small for the posts on the current upper/lower hose fittings, but the outer diameter is pretty much perfect (just over 1/4", ~8mm).
Power Cord
I used an 6' (15' extended) coiled cord, like a mic cord, with about a 5mm (0.2") wire diameter. Mine happens to be a 4-wire cord, but it was just a nice looking cable I found at a local surplus store (Vetco Electronics).
Suppliers
If you find great sources for hoses or whatnot, let us know!
Hoses -- ???