
Fusion Generator:Kresty Style Build:Alignment Template
Back to Kresty Style Build guide page or the Base Assembly page.
Contents
Alignment Template
An Alignment Template PDF is available for download.
The bottom bits of the Base Assembly have numerous parts, particularly on the bottom ring. Aligning them can be challenging.
The purpose of the alignment template is to show where the parts should be mounted. The inner rings have 8 divisions, the outer ring has 32 ticks, one for each of the outer ring parts.
Printing
The PDF is a 16"x16" page size. That will undoubtedly require tiling multiple pages together. Acrobat can print tiled pages. I overlapped them by 1/2" or so to aid in alignment and taped them together.
Make sure when printing to use your applications "actual size" print settings.
Cutting
The templates are 3 paper rings. The inner circle, outer part, and the 2 middle little rings can be discarded.
You can cut them with a model knife or scissors. Of course I used the laser cutter :)
Laser Cutting
The Guides.pdf file has thin 0.1pt black RGB #000 lines for vector cutting the circles.
- You can usually run previews with a red pointer turned on and the top open to adjust the position of the printed paper to fit the laser.
- Choose appropriate settings for paper.
- Our laser wants to blow the paper around, so you may have difficulty finding a cut order that doesn't destroy the first cut parts. I used small weights to hold the rings in place (after aligning to the laser cut area).
Alternate Laser Method
The "Guides (Laser).pdf" file includes 0.1pt RGB black #000 vector cut lines and RGB blue #0000FF vector etch lines. If your laser cutter allows selecting by color, you can avoid printing it and just burn in the guide marks.
- Assemble a paper at least 16" (400mm) square
- Set the black lines to do a vector through-cut on the paper
- Set the blue lines to do a vector low-power vector etch on the paper (like the cut settings, but much lower power).
You may need to play with your settings to get the blue marks to etch without cutting through the paper.
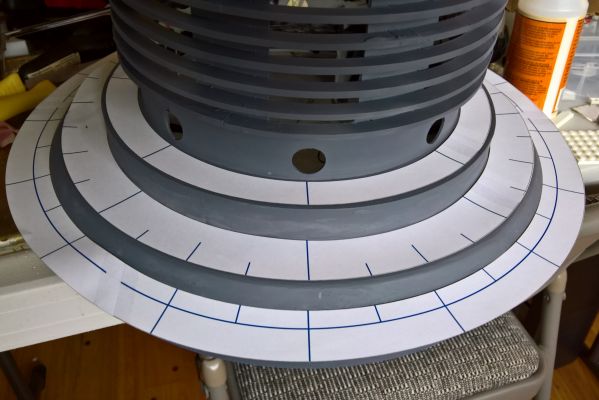
Template Placement
See this photo for proper alignment of the template rings:
The picture shows the grill in place, but it might be easier to place the center ring template and then the grill.
- The center ring goes on the top flat ring of the base and has the tick marks aligned with the round openings in the bottom of the grill.
- The middle ring goes on the lower middle flat ring of the base with the long marks aligned with the center ring tick marks.
- The outer template ring fits halfway up the slanted base band/ring. Try to make sure it's equally distant on all sides. Again the long marks are aligned with the middle ring's long marks.
Template Usage
We need to mark places for the 8 small lower hose fittings on the "G" band and 32 positions on the bottom "E" band.
You need to assemble the base first. You may want to do whatever putty, sanding and priming you want before using the templates.
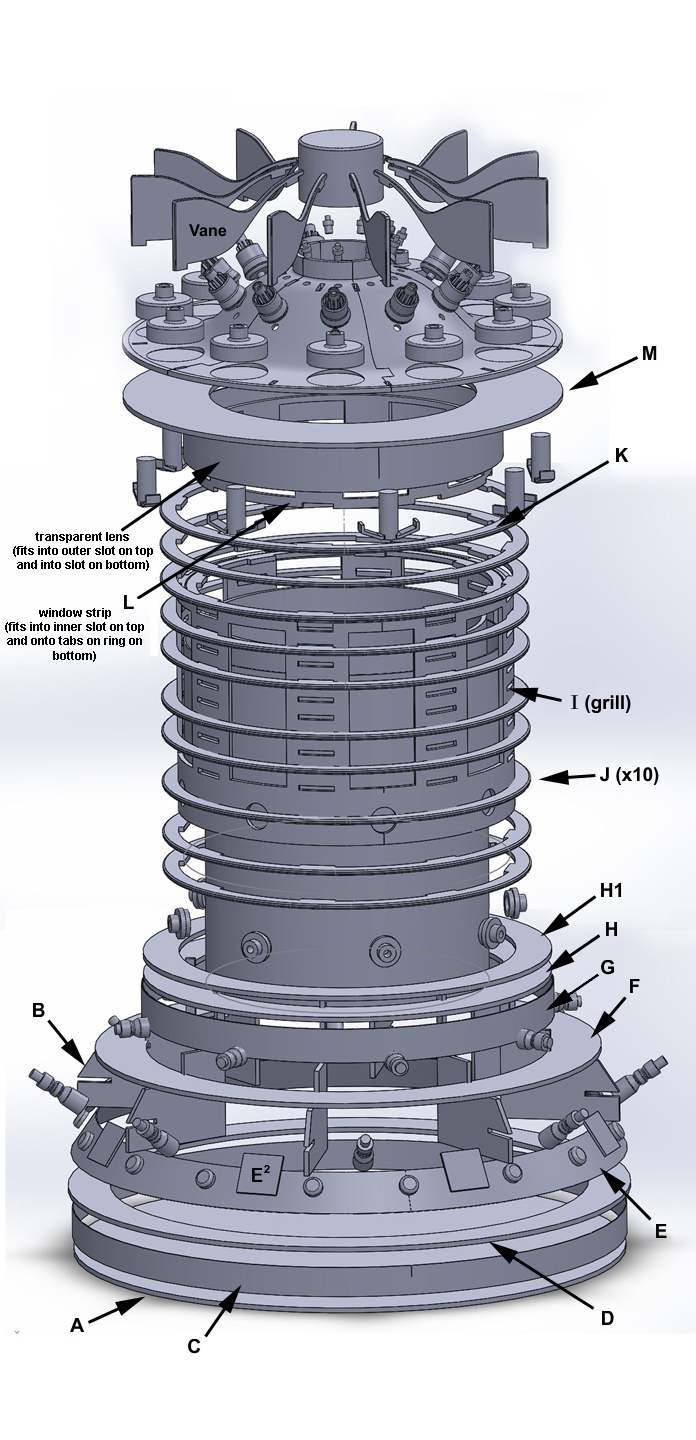
(note: the canon short build does not have the extended C & D band & ring shown in this diagram.)
Using a pencil, make a tick mark along the centerline of the G band at each of the eight long template guidelines for the short lower hose mounts.
On the E band centerline, make a tick mark at each of the 32 alignment marks.
Note that the 32 alignment marks alternate lengths. This is because the E band has 16 evenly spaced "buttons" at each of the small tick marks. The other 16 marks alternate between the lower tall hose mount and the "round caps" (or optionally, the E² laser cut squares.)
It is difficult to tell from the reference photos whether the lower hose short and tall mounts are aligned or offset. I chose to place the E band mounts between the G band mounts.
Back to Kresty Style Build guide page.
Back to the Base Assembly page.
Forward to Top Assembly