
Fusion Generator:Kresty Style Build:Grill
Back to Kresty Style Build guide page.
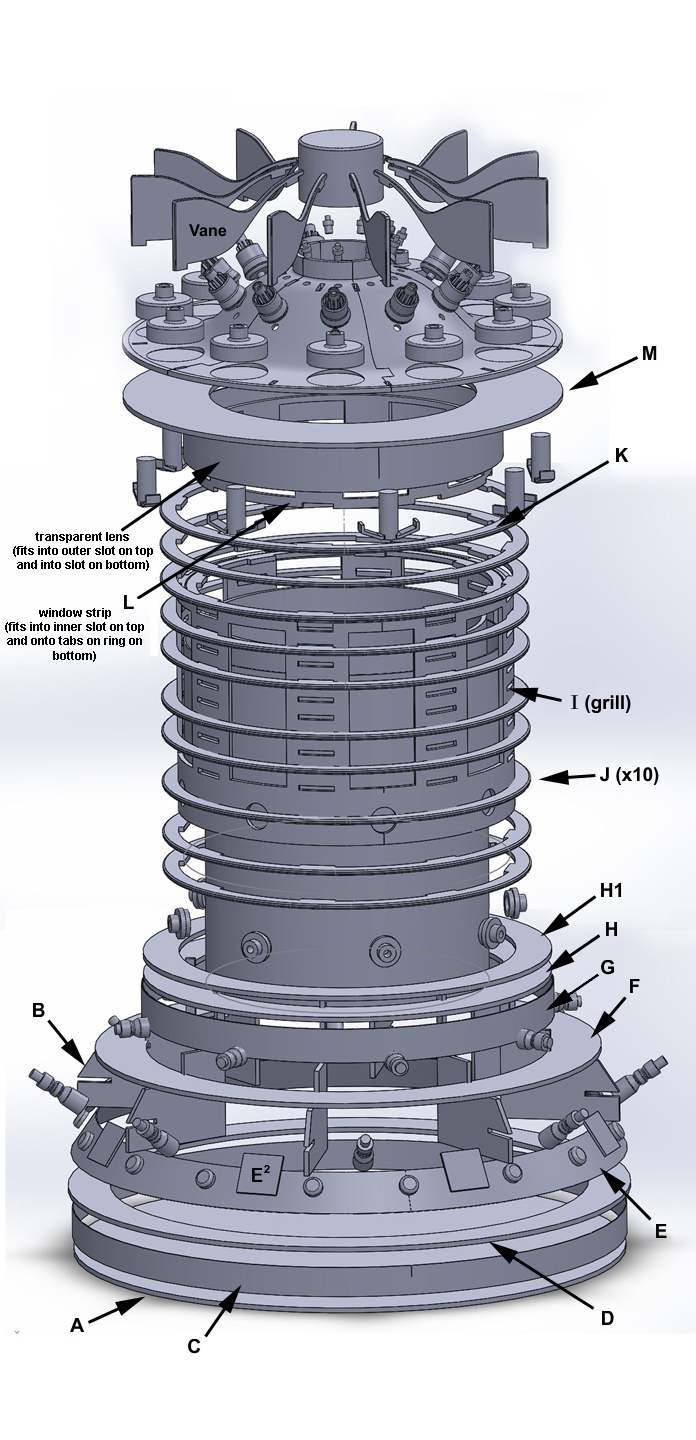
The middle grill section fits between the B supports on the base and the inside of the H1 ring at the bottom. On the top the tabs fit in slots in the M disc.
Contents
Decision Points
Before assembly, it is important to determine where you want to remove the top. Between the Grill and the Base is a decent choice.
Fusion Generator Grill
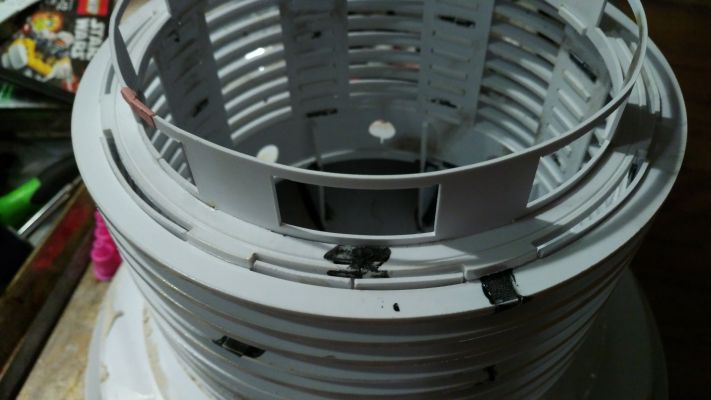
The grill is two halves "I" (larger cutters could cut a single part), which is rounded into a cylinder and holds a bunch of the grill slats "J". The top slat "Jtop" is extra wide, and the K ring fits on top of that. Above the K ring we have the L "windows" and the upper diffuser. The lower diffuser goes in the "grill" cylinder.
Bending the Grill Halves
Since the grill halves are cut from flat sheet, they don't want to bend into a cylinder very well. Worse, when you try to bend them evenly, the skinny slats bend easier than the thicker center sections.
What I did was to gently press the each grill half over the corner of a table, working each one from one side to the other. I then pressed on the edges to bend the styrene slightly over the corner. When done it wasn't nearly as tight as the final cylinder, but it helped a ton.
Grill Bottom
I used the space between the B supports and the H1 ring on the base to help hold the shape of the grill. This is the easiest spot to remove the top, so use care if you don't want to glue it here. If you want to remove the top between the J & K rings or the M ring and the top, then you can glue the grill to the bottom here.
J Rings
There are 9 lower rings, mostly split into two halves, though the plans had room to print some as entire rings. The tabs in the rings should fit in the slots of the grill. If not you may need to sand the openings (&/or tabs) a little.
The top ring is special, a wider ring like a combined J & K ring.
I fitted one of the complete rings into the bottom and the Jtop ring to the top. If you have more complete rings, try to space them evenly.
The J halves I then pressed into place in the remaining slots, taking care to stagger where the seam between the rings was, rotating the position as I went up. You will find that the combination of the staggered halves will help the grill maintain the proper shape.
After fitting all of the J and Jtop rings into position then I glued them at their joints to the main I grill, using a thin glue to wick into the cracks.
K Ring
The K ring fits to the top of top of the Jtop ring. You may choose to separate the top from the bottom at this point, in which case you would leave it unglued, but I'd recommend separating at the bottom of the grill instead.
L "Window Strip"
The "Windows" fit between the top of the K ring and the M disc. The upper diffuser fits on the outside of the window strip. That means that before gluing the window strip to both the K ring and the M disc, the window strip must be painted.
After finishing, then the window strip and upper diffuser can both be fitted and glued. If you glue everything first, you'll have a hard time painting the rest without overpainting onto the diffuser.
Light Leaks
Presumably you'll illuminate the interior somehow. I did not feel that the grill section needed much putty, but I shined a light inside to help locate cracks where light might leak. There were a few pinholes where the J ring tabs fit into the grill slots. Those I filled those from the inside (I actually just smeared on ABS pipe glue to clog those holes, quick and dirty)
Main Hose Fittings
These rings are intended for the upper hoses to fit within them, and they fit into the holes at the bottom of the grill.
These fittings are supposed to be translucent to pick up the light from the inside of the fusion generator, so you probably don't want to paint them.
You will want to test-fit the hose fittings, but do not glue them into place until after the model has been painted. (Mine even fit without glue.)
Diffusers
As mentioned, the upper diffuser needs care when fitting over the Window Strip.
The lower diffuser can be left until last and shouldn't be added until after painting.
I found that curling it up and inserting it from the end of the grill lets it "spring" open against the grill. Using the 24" diffuser, I found it fit the openings perfectly even though it didn't go the whole way around. Alternatively you can add use a two part diffuser. I'd try to keep the seam behind solid parts of the grill so they aren't visible. The lower diffuser probably doesn't need glued.
My diffuser was very clear, so in order to get the light to diffuse more evenly I placed a piece of paper inside the cylinder. I was lazy and just folded over one edge to get it short enough and my two pieces of paper overlap. You can be neater about it, but it's not very particular.
Grill Assembly
With the styrene (polystyrene) parts, most plastic model glues should work, such as plastic cements, solvents, or CA glue. You may want to test your bond before committing. A thin glue can wick into the cracks even after assembly. Model putty can help fill the pinholes that might leak light around the grill.
- Carefully curve the "I" grill halves lengthwise.
- I pressed them over the edge of a table, slowly moving from one end to the other.
- Use a method that bends evenly over the thin and thicker parts. (A heat gun did *NOT* work for me!)
- It does not have to be completely bent in this step, the J rings will provide the rest of the curvature.
- Dry-fit the "I" grill halves into the full J and Jtop rings.
- Dry-fit the remaining J half rings, staggering the join spot for the ring middles.
- Once satisfied, glue them into place.
- Glue the K ring to the top of the Jtop ring
- (If desired. Not recommended to split the model here, but if you must, don't glue the K and Jtop rings)
- Glue the L Window Strip to the K ring
- Do not add the diffuser(s) at this time, the model needs painted first.
- You may dry-fit the M ring to the top of the L windows strip, but do not glue it or you'll have a tough time adding the upper diffuser later
- Apply and sand any putty you may want
- It's probably worth shining a light through the edges to see if there are any pinholes you want to fill.
- You may dry-fit the bottom of the I grill to the diffuser, but don't glue if you want to separate the model here.
- Paint the model
- Remove the diffusers before painting
- Remove the translucent main hose fittings before painting.
- After painting, you can install the upper diffuser and finish gluing the L Window Strip to the M ring.
- After painting, you can install the main hose fittings
Back to Top Assembly
Back to Base Assembly
Back to Kresty Style Build guide page.